 Menu
Menu
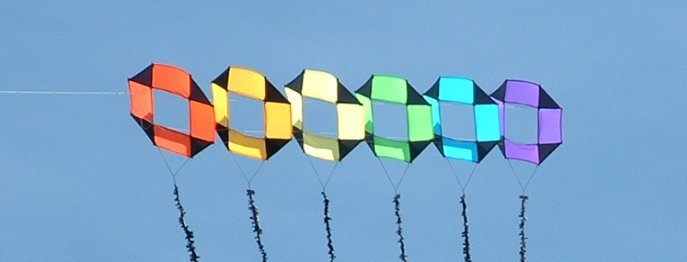
DIY Achtkant Train - Intro
Welcome to this tutorial.
There are 7 stages to this tutorial and the last one, making the pilot, is optional:- Introduction, materials needed and design.
- Getting the templates ready.
- Assembly of the sails.
- Adding reinforcements and pockets plus fitting the spars.
- Making the tails.
- Bridling and flying.
- Making the pilot kite [optional].
Introduction.
This kite is designed by a well known Dutch kite builder and designer named Harm van Veen.
It was quite some time back, in the late eighties or early nineties I believe.
What I do know however is that it was first published in the early part of 1991 in the Dutch kite magazine "Vlieger".
I liked it at first glance and wanted to do something with it, hence this train of his adopted kite.
It was quite some time back, in the late eighties or early nineties I believe.
What I do know however is that it was first published in the early part of 1991 in the Dutch kite magazine "Vlieger".
I liked it at first glance and wanted to do something with it, hence this train of his adopted kite.

Materials Needed.
The material list below, describes the items needed to make a train of six. This is a good starting point and you can always add more should you choose to do so.At the end of this tutorial I will also describe how to make an original 1.5 meter "Achtkant" as the designer meant it to be albeit with a few modern bits.
This 1.5 meter version is meant to be used as a lifter, to make launching a larger train less stressful.
For those who just want to make a fifter version, I suggest you stay tuned for it as it is slightly different in terms of construction.
NOTE: The amount of fabric used is calculated as if you were making each kite in two colour and includes the tails.
This amount will vary little for you should you choose to have a different colour scheme as I am sure most of you will end up having.
- 3 Mtr. of ripstop (Six Pack = 2Mtr. for main colour and tails, plus 1Mtr. for second colour).
- 24 fiberglass rods: 60cm x 3mm solid. (alt. 4mm dowling).
- Dacron for reinforcing and pockets: 50cm x 20cm.
- 24 small eyelets.
- 24 small rings. (split rings or brass curtain rings).
- 48 rubber End Caps 2mm.
- 60 meters Dacron line 1mm or about 50 pound for bridles and tails.
The Design.
Each kite is made up of at least eight panels, this is to minimize stretch and to keep the bias running along the outer edge. To accomplish this we really only need two different panels. I have given our two panels a different colour for illustration purposes only and it is up to you to choose your design.
To help with your design, there are two examples in the diagram below that appeared in black and white in Vlieger magazine when the plan was first published.
In the example diagram you can see that in both instances, multiple templates will be needed for either design.
Looking at the example kite #2, the changes are made to panel A only. Although at first glance this looks the more complex of the two, surprisingly there are only 4 templates needed as with example kite #1 you will need 5 templates. So choose your project design well.

Two Examples.

Six Pack.